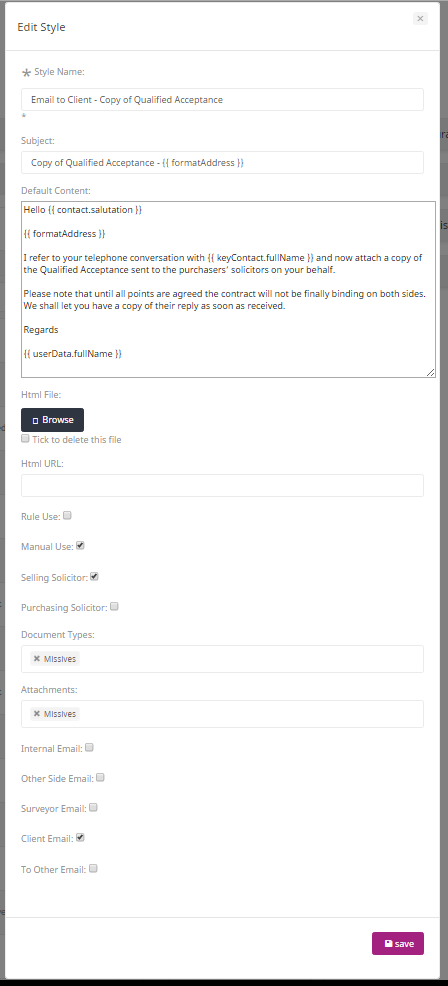
To upload you must be an Administrator. Go to the configuration section, you will see a widget titled ‘Email Styles’, this widget contains all of the email styles available for your firm to use. At the bottom of this widget there is a button that says ‘Click here to add a new style’, select this button and a dialogue box will appear on your screen (image below).
This dialogue box will ask for various information regarding your email.
- Firstly it will ask for the title of the template, this is the name you will see when you are choosing your template from the list of possibilities on the transaction page so make sure you use something that is easy to understand!
- Then it will ask for the Subject of the email, this is the line that will appear in the subject box of the recipient so be sure to keep it as concise and relevant as possible.
- The next box is the content of your email. This is whatever you would like it to be. Copy and paste your email text straight into the ‘Default Content’ box and include placeholders where information from ESPC Legal is to be pulled through.
- The HTML URL field is the link to your hosted email footer. When you send an email from ESPC Legal it will wrap the content within the Email footer.
- The next four tick boxes are options for your email. ‘Rule Use’ and ‘Manual Use’ are used to describe whether your email is used as the result of an action being take on the site (Rule) or if you are only wanting to create and send the email out manually. Then you have the option of whether your email is shown on Purchase transactions only or on Selling transactions only, or both (select both options to show the email on both types of transaction).
- Document Type is the type of document that this email is associated with. Attachments is the option to select a document type that will automatically attach the latest version of itself to this email. So for example your email states that ‘I have attached a copy of the qualified acceptance’,provided this is the last version of the missive document currently on the system, if you select ‘Missive’ in the Attachments box, the latest missive document will automatically appear with your email so you don’t need to remember to attach it!
- The next five check boxes are to select who the recipient will be. The reason this is outlined here is that when you create the email, the templates that you are presented with is dictated by who you are intending to send it to. For example, if you are emailing the Other Side, you will not be able to choose from the templates that are associated with the client as they won’t be shown as an option for you to choose from. If you would like to be able to send this email template to multiple people, select all those whom you wish to send to and the template will appear across all recipient lists.
Then select ‘Save’ and your template will be created! Email and document templates are shared on a firm wide basis so all your colleagues will also have access to your styles and templates.

